Showing posts with label free. Show all posts

Saturday, March 1, 2014

Read Across America Success

In my last post about Read Across America I had uploaded the Thing Icon with Teacher in it. Here is a picture of how it turned out. We loved the final product. I made the hair like if I was making a tutu. Like my coworkers called it a head tutu, you can find the info on the hairpiece here

Also in my previous post I had mentioned an Oobleck activity. This was a great success in my classroom. Other than running out of time, my students and I loved this activity. Students had a new experience and outlook of Oobleck. I will definably do this activity again next year.


This was my door decor for this day. Based on the book, Oh, the Places You'll Go! My decoration consisted of road of different shapes, sizes, and edges. Along the roads there are shoes walking different paths. The shoes are a little booklet where students wrote about where they plan to be when they grew up. It wasn't just for career plans, but in general. For example, where they plan to go to college, where they plan to work, etc. You can get a copy of the shoes here.
During our festivities students ate green eggs and ham. After they ate green eggs and Ham and we read the book students drew where they would like to eat green eggs and ham. I had a range of roller coasters, space, and many others.

Another activity students did was to read directions found on a Jell-O box and to create Jell-O. After students created the Jell-O they placed a couple fishes (of course candy fish). And they had their One Fish, Two Fish.


Students enjoyed following directions, having the experience, and most of all their final product.


Between all the excellent readers and all the exciting activities this was one of the best days this year. It was a day to remember.

Wednesday, February 26, 2014

Read Across America Preparation Part 2

Hello Everyone! Read Across America is around the corner I can't believe it. We will be hosting our Read Across America Day this week! This year I have used many of the things I have used in the past, with a few exceptions or fixes.

Looking back at my previous Read Across America Preparation post I realized that I never posted the invitation and reminder letter that I carted for this celebration. You can find the file by clicking the files name.


For Read Across America Day I used:

Guest Reader Invitation
I had uploaded this invitation. Most of the text are as a picture format to ensure that everyone gets the finalized file. If you download the Dr. Seuss fonts you can simply insert the information needed on the space provided and have your own invitation. For this file I used a Dr. Seuss font that you can find Here.


Guest Reader Reminder
This may look a bit different from my first post since I could not find my original anywhere. So I recreated it with a different background. Just like the Guest Invitation it is a picture with text boxes where you can insert the information. For this file I used the font A Little Pot. You can find the font  Here.


Oobleck
I am excited for this activity. In the past years I have done Oobleck with my students (green food color, water, and corn starch). I had my students play with the Oobleck and talk about it but never did much with it. This year I am excited to use the worksheet I just created. Student will still experiment with the Oobleck but also incorporate some of the skills that we have been working on during our Literacy block. This is also another FREE item to you can get on my TPT store.


Teacher 1 Teacher 2
My teammates and I want to dress up as Thing 1, Thing 2, Thing 3, and Thing 4 for our Read Across America Day. The problem was that I could not find a logo that said Teacher instead of Thing. So I created one for us. This product has Teacher 1, Teacher 2, all the way to Teacher 8. The logo is done correctly and inverse so that you can use it on which ever paper you have to iron on to your shirt. Oh yeah, IT IS FREE!


I like to try out my products first, but in this case I did not have the opportunity to try the shirt imprint and the Oobleck worksheet. I ended up posting these anyways for those who are looking for these products. If you do use it please let me know how it works out for you, I would love to see pictures.

Tuesday, February 18, 2014

5 Food Groups-Nutrition

Earlier in the school year our class did a nutrition unit where students learned about the 5 food groups and the good and sometimes foods to eat.

This was a fun and interesting unit to work with my students. When working on the food groups it was amazing to hear all the misconception that students had.


One of the biggest WOW misconceptions that I heard students ask me was is Orange Juice part of the Dairy group. I had to think really hard about why students had this misconception and came up with a conclusion.


According to the new Food Group Chart from Myplate.gov dairy is in a circular cup. My students thought that anything that is drinkable was a dairy product such as orange juice and water. As a result many had difficulty understanding that dairy can also be a solid like cheese.

As part of this unit I asked students, super market, and teachers to donate different grocery weekly ads for a real life application of the food groups. With those ads we did three different activities.

1. Food Group Flip Book:

Students looked through the ads to find healthy foods that fit into the different food groups. They placed what they found in this flip book I created.

Students enjoyed looking through the ads discussing with their teammates what could be placed in each food groups. I loved this activity and I am looking forward doing this activity again next year.


       You can find your FREE copy 

here
It was amazing to see how many students did not have experience with the ads. They did not know how to read them nor how to find specific categories. It is for sure the art of reading ads has been lost.


2. My Plate Poster:
I traced a poster size of the My Plate diagram and had students work in a group to put examples of healthy food that are part of each food group. This activity is similar to the flip book but instead of having a reference book it is in the plate diagram and students are exclusively working as a group. I did this acidity to give the students' ample opportunity to understand the food groups and talk though the misconceptions many had developed.

3. Sometimes Food:
The easiest activity of all, using the grocery weekly ad students looked for foods that fit the sometimes foods. Students enjoyed this activity and I had some unique and unexpected answers as shown in the picture for this activity.


When I was doing this unit I searched and searched the Internet for good ideas. Through my search I was amazed the resources that the US Government has provided for teachers and parents. Myplate.gov has excellent resources for teachers both hard copies and digital.

There are songs that students just loved and begged for me to play over and over again.

You can find lesson plans and the activities that go with them for free at various grade levels. They are made to fit the needs of each grade level.

My teammates' favorite resource was all the supplies you can order for FREE! You can get posters, worksheets, lessons, books, and so on. ALL HERE for FREE. They even ship it for free.  A huge thumbs up for USDA!

Friday, October 11, 2013

Classroom Library


Oh my once again, I let the blog go and haven't posted anything.  I have been busy, according to my students I have been fighting the Hulk and I have rearranged my classroom library.

My classroom library was arranged between fiction and non-fiction then by grade level. Once my students started using my classroom library for their Read to Self and Read to Someone it all went down the drain. As my library was no longer arranged, I had books everywhere and students kept on pulling books from the shelf and just making stacks on top of the shelved books. It was a huge mess and it was driving me insane.

My Newly Arranged Library 
I searched and searched to find a library system that I liked. I found some great ones, but none that had everything I wanted. I am picky with specific needs. I suggest that anyone out there who is trying to arrange their classroom library to search for some ideas but at the end of it to create one for your own needs it will make life easier if you are picky like me. I will post my tub labels and the labels I used for each book but remember it was created for my library, feel free to change and modify what I have to fit your needs.

What I did was to first arrange my books into categories based on what made sense to me. I started with my non-fiction books and chapter books since I had less of those types of books. Then I moved on to arranging books by what I had multiple copies of, and so on until every book was in a pile or tub.

As you sort the books I suggest scanning each book or manually inputting each book in an online database. This will help find books and know what you have in your library. I use a free website called Classroom Organizer. This website is simple, nothing too fancy but it has everything I need. Some books can be scanned (if they are old books like most of mine they might not scan), for those books that  can't be scanned I found them on Amazon and copied the ISBN number onto the website. Once the book is inputed in the system, you can add the books grade level, Lexile, Genre, how many copies you have, and the coolest part when organizing a library the location. The best part if you allow students to check out your books you can use this website to do so.

After creating many piles I started working on the computer and creating my labels. I created a larger label, which I printed on regular paper and then put on construction paper (yellow for non-fiction and blue for fiction). I also created a replica of the larger label on a standard size label to place on the back of each individual book.

After that it is nice and easy. I placed each pile in a tub and arranged them on my shelves. Using tubs does take up more space than just placing them in a bookshelf, but the space is worth the mess that you would have otherwise.

I hope this has helped anyone out there that is trying to organize their classroom library.

Tub Labels          Book Labels
Disclaimer: When I posted the labels on my Google Drive the pictures did not quite align with the labels, but when I downloaded it from the Google Drive it was how I originally had it. If that is not the case for anyone else please let  me know. 


Wednesday, June 19, 2013

Read Across America Recap

Mayor G. Stanton and Me

I promised more pictures and ideas for Read Across America day, and I am finally completing my promise. Read Across America Day this year was amazing, we had wonderful guest who read to our students ranging from teachers, newscasters, cheerleaders, to the city's mayor, and secretary of state. Our school was busy and a lot of books were read throughout the day. 


We had other special guest who arrived at our school. The Cat in the Hat, Sam I am, The Grinch, Thing One and Thing Two also visited our school to celebrate Dr. Seuss's Birthday. The best part is that the students enjoy dressing up as the characters and being helpers for the event. These students get to walk the guest to the classroom where they will be reading at and they get to stay with the guest while they read. It is the students' best memory. 

Thing 1 & 2's headband
These costumes are easily made; The Grinch and Sam I Am costumes were put together by my good friend Pam Gavina. A yellow dress/shirt for Sam I Am and a green long sleeve shirt with a felt heart shape on it. Thing One and Thing Two wore a red shirt with a paper sign on them. I wrote PRO instead of Thing because that is what we call our students at our school. Instead of buying a blue wig I made a headband made of turquoise tulle. The headband was easy to make, just like a tutu. For more instructions on how to create the headband go to this blog, and instead of making a full tutu simply make part of a headband. Remember to adjust the length of the "skirt" because it is hair. : ) 


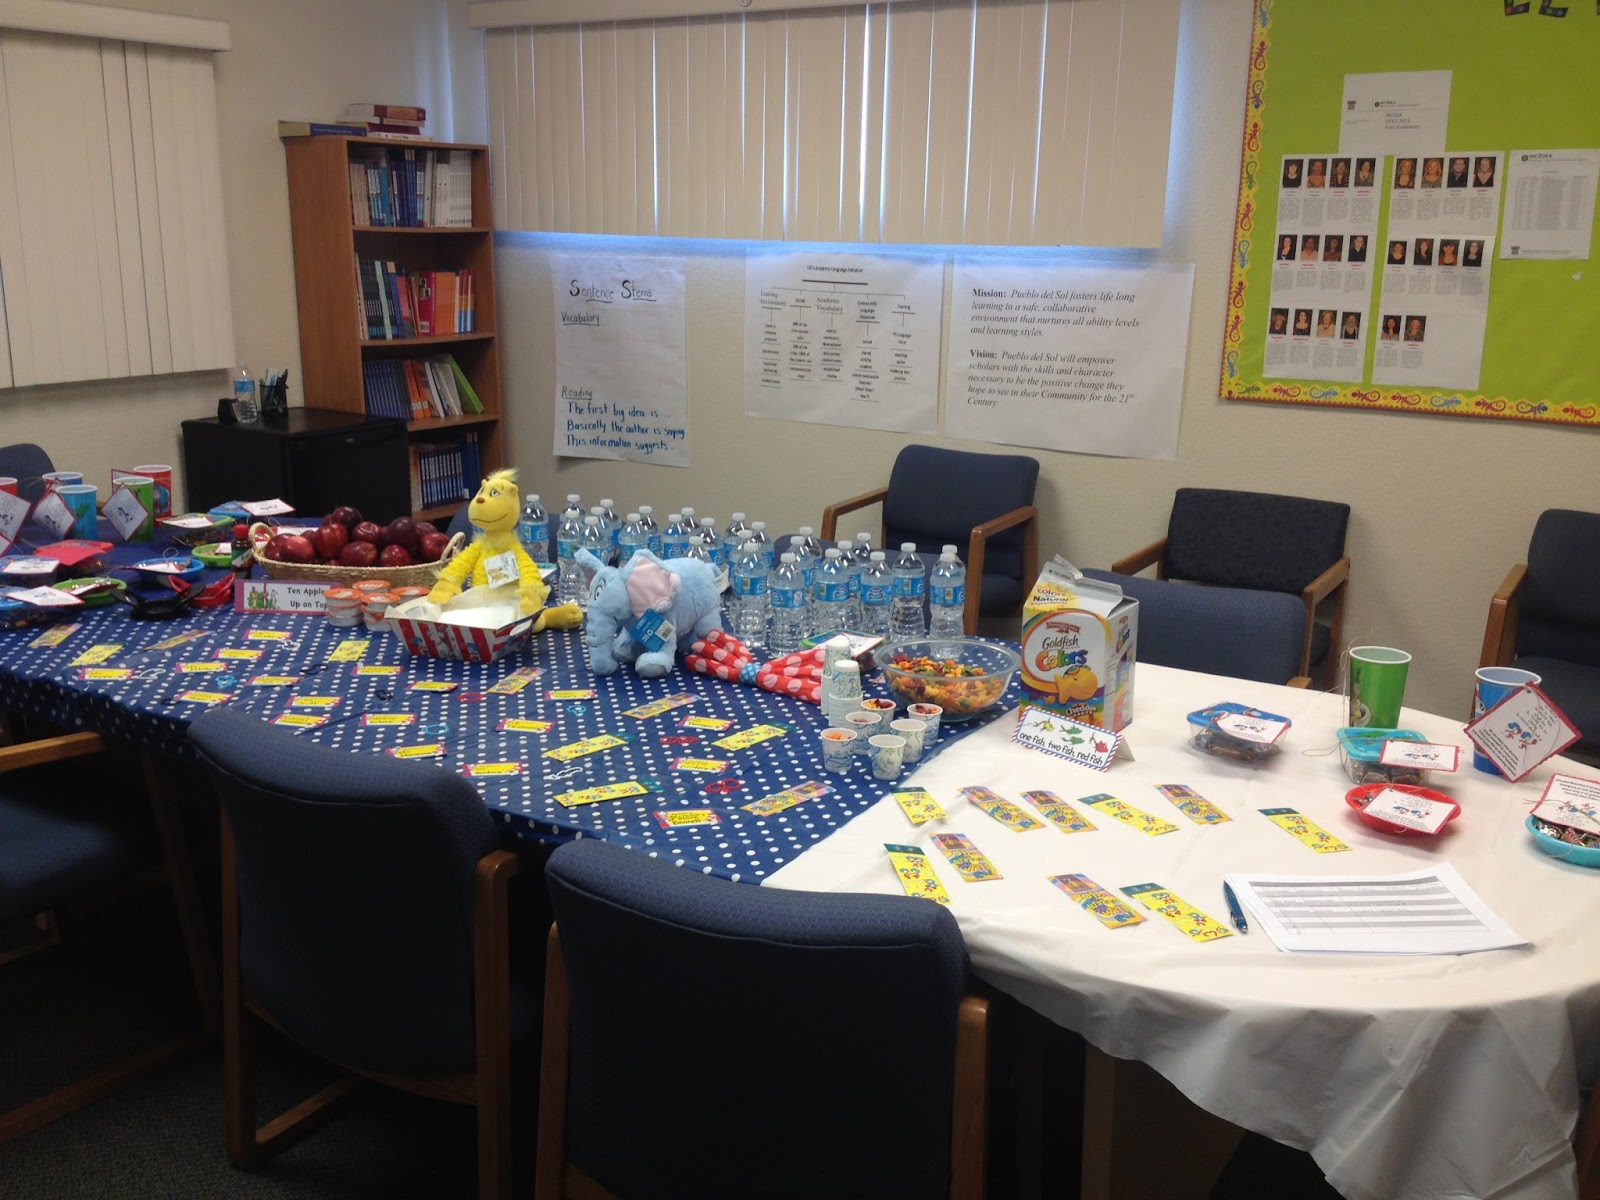
The readers were also greeted with a treat. This always makes them feel welcomed and appreciated for taking time out of their busy day. The greeting/waiting room area has a sign in sheet. This sheet asks for their address so that students can send thank you cards after the event. In addition, there is water, snacks, and their thank you gifts as shown in a previous blog post. Preparing the snacks is always the fun part, to match a snack with a Dr. Seuss book. No, I wasn't the creative one that came up with all these ideas. I found the ideas online. 
 One Fish Two Fish: Goldfish
The goldfish sign was by Shy By Design. I loved her sign idea and I incorporated it to the rest.  I ran with it. I had Dixie cups where readers could grab some colored goldfish to munch on. The goldfish were in a nice bowl.
Ten Apples Up On Top:  Apples
A basket full of nice red apples with some caramel or Tepin chili as a toping was also placed in the reader's table. I also included a cutting board and an apple slicer. I took the goldfish sign idea and created a similar one for the apples.
 You can get the Ten Apple Sign Here.

 from KPHO CBS 5


Friday, August 3, 2012

Smartiesfied

After 6 years of smarties and always singing our Smarties Cheer, I finally went all the way and smartiesfied our classroom.

To start off I started working on our Smarties classroom website. I wanted to personalized our classroom as much as possible so that my students could relate to it and want to go to the website for all the wonderful resources. One of the first steps that I took other than finding the correct free web host was to have my 12 year old niece, who is a wonderful artist, draw our class logo.

I wanted to do more with the Smartie theme but I was unable to find any classroom products to decorate and use in my projects. This resulted in my latest adventure.

SMARITIES BULLETIN BOARD


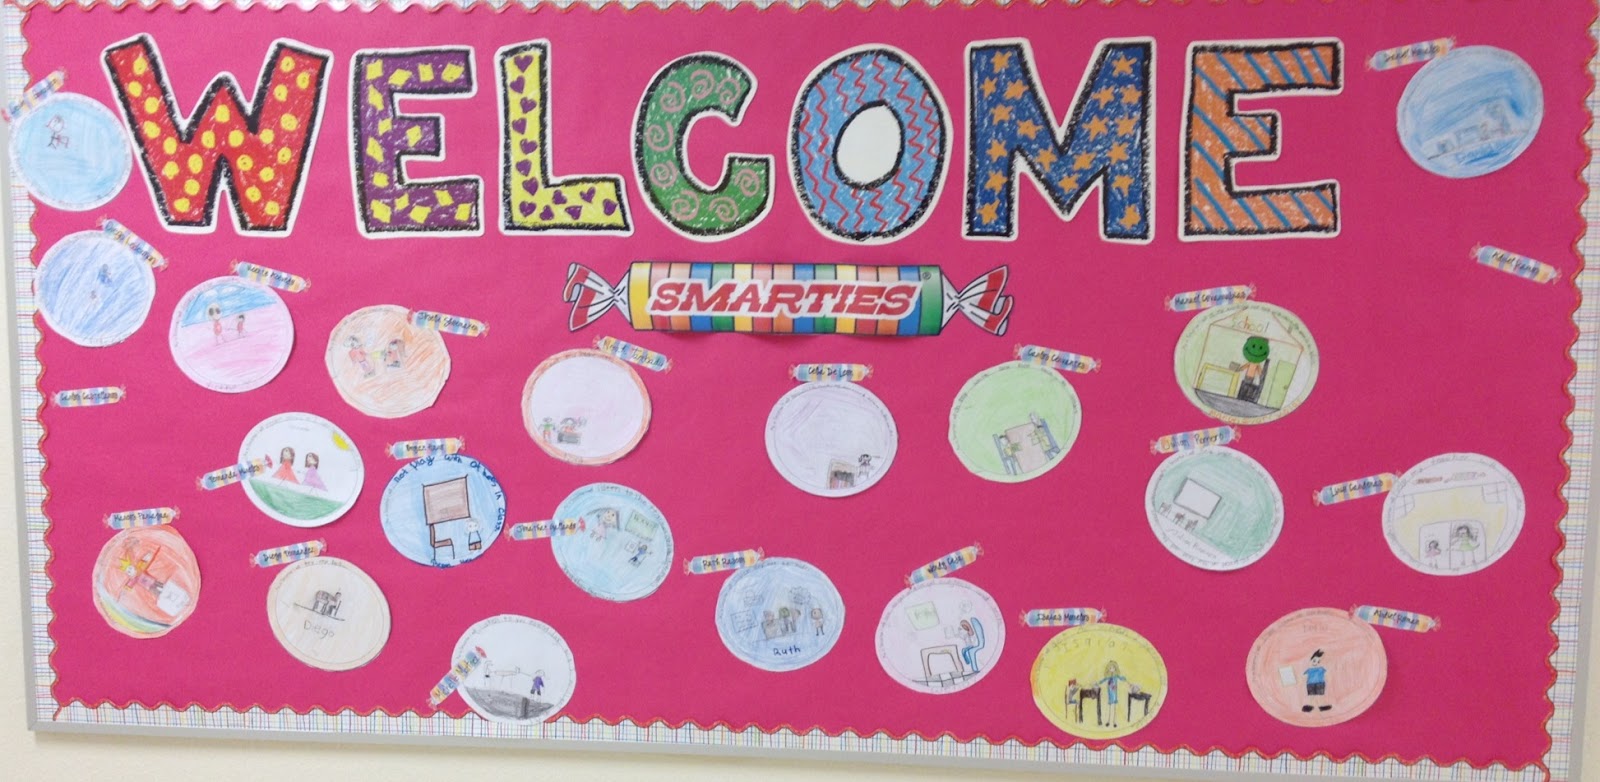
I know this looks a bit plain but that is temporary. Once school starts students will create a goal sheet on a circle to represent the actual Smarties candy. Once the students have finished their goal sentence they will draw a picture of themselves in the middle of the candy that will provide details about who they are and what they like. The smarties name plate will be used to place next to the students work. 
I will post an update as soon as my students complete their portion of the bulletin board. Stay tuned. 

All templates are provided or you here free. 

What do you think?

**********UPDATE************
Here is the final look for my bulletin board. With a constant flow of new students it took a while to get the board updated. Two more kiddos to go and I will have 100% completion. Writing the smartie goal really made mys tudents to stop and think about what they wanted to accomplish in 3rd grade. Not only that but now I have a way to keep them accountable for their learning and meeting goals.
After my smartiesfied year I decided to take it a little farther and make our school vision/Mision and classroom rules also on smarties candies. This has given my class a new look and the kids and I just love it.


Monday, April 23, 2012

Testing Days 2, 3, and 4

I wanted to post this since last week but it was a busy and sickening weekend. Well to make my story short, I was sick starting Thursday, finally in shoes, and on the final days of my current course. Crazy huh? Nah I have had crazier weeks.

Testing week was a bit hectic but nothing out of this world. My students enjoyed every test treat they received every morning on their desks. They also enjoyed trying to figure out my word play.


My students were also excited that to get homework passes for showing their work an trying their best. They were so funny, as they did not let me forget to pass out the passes once testing was done that day.

Well testing is finally done! Well I am not to sure I am too excited about that. Since this is the time when students get rowdy and believe they no longer have to learn and pay attention. This called for fun thematic units!


Find all the different test treat labels here.

Tuesday, April 17, 2012

Test Week Day 1

To a wonderful start to testing week!

To my students surprise when they arrived to class today they found a little something waiting for them. They discovered a letter sent to them with a little treat for being there today. I always look forward to do these little something for them, in order to encourage them to try their best.


Free Download of:    Letter           Label
Today's treat was a plastic Easter egg with candy inside. The students were not allowed to eat the candy nor to open it until they got home today. The egg had a label saying: Don't forget to try your "Egg"stra hard! I did put the disclaimer out there that you do not spell extra with the word egg . My purpose was to play with the word extra to put egg into it for the egg that they received. My students loved their treat and were laughing at my "egg"stra joke. : ) You can find the letter and the egg label for FREE on my teacher store either on TPT or TeachersNotebook.


Even though in 2nd grade we do not give the AIMS test, we do however take the SAT 10. In order to get my students motivated, I showed them a song that I found online. They did not only love the song but they eventually started singing along. We were blasting our music that the assistant principal went to our classroom to ask me to lower the music as it was loud and could be heard outside the classroom. 
There are many different versions of this video, but I believe this one to be the best. Kudos to the person who recorded this version of the song, and who created the video. Best of all it was uploaded to teachertube.com which means that it could be showed at school, and it is not blocked. : )

Tuesday, April 3, 2012

Perimeter and Area Idea

I did this evaluation project with my class and my students enjoyed it. 
The sames are the same for both perimeter and area the only difference is  the product and last step. 

I know this idea is not new and someone else may have already posted it somewhere, I know there is something like this in the investigation math series, but I have modified it so that students can partition the rectangles how the common core states. 

1. Take a piece of paper and fold it into eights. 

2. Cut out all eight pieces. 


3. Take one rectangle and fold it into fourths and trace. (Do not say anything about four) Ask: What is the area/perimeter of the rectangle?

4. Take another rectangle and fold it into sixteenth. (Do not say anything about sixteen) Ask: What is the area/perimeter of the rectangle?

5. Ask: Why do we have a different area/perimeter if it is the same shape and size? Discuss how many products that we buy have different measurement on the same product.

6. Fold all the rectangles into sixteenths. 

7. Cut out different shapes, that have different areas/perimeters using the rectangles. 

8.  Students are to find area/perimeter for each shape. The they are to arrange them from greatest to least or least to greatest. 
For area: I used sentence strips to order them. Next to each shape the students wrote the area using the square unit label. 

For perimeter I had students order them on paper so that students could also show the method that they use to find the perimeter of the shape. They are also to label each shape using units. 
This is also a great idea for a bulletin board. My students really enjoyed cutting the shapes out and ordering them.