Friday, April 5, 2013

AIMS Smarties Style


For our testing bulletin board we went with Gangnam Style by PSY. Students loved the bulletin board and made it related to them by adding the Smarties to his hands. That was their favorite detail. 
On PSY students wrote test taking tips and strategies that they plan to use on our state test (AIMS).


Students enjoyed this activity. To see my Smarties and the other students' reaction to my bulletin board made it a successful one.


Now we just have to say:
Eh-- AIMS passers.
AIMS Testing Style
Eh- AIMS Crushers
AIMS Style.

You can get your copy of PSY Smarties Style here.

Or you can simply get PSY at http://screenfonds.blogspot.com/2012/12/psy-coloring-pages.html.


I created a remix with the Gangnam Style Lyrics to make it more test prep/motivational for our state test AIMS. I also persuaded my sister to record the song and coworkers to go along with my crazy idea. : ) I hope you enjoy and can use the video.


Tuesday, February 26, 2013

Read Across America Preparation


Read Across America is around the corner, and as an organizer there are many things that I have to do to get ready for this wonderful event. This is what I did this year:

Getting Presenters: I used the same invitation that I used last year to invite guest readers to our school.


Gifts for our presenters: During the summer, Target sells their Dr. Seuss items in the dollar section. This year I had to call in favors and had a friend and family members buy these wonderful gifts for our presenters. I filled the bowls, cups, and boxes with different candies, attached a tag, and tied it together to make this a gift to remember. : )


Getting kids ready: This is an exciting event that students look forward to, either to eat some great green eggs and ham or just to have something different occur in their class. One thing they tend to forget is that at the same time that they are having fun, they are also learning in one way or another.


Certificates for Presenters: 
The poem on the side of the certificate is from NEA's Read Across America Poem Page. I thought it was a cute message to include in the certificate as a reminder of what the presenters did on March 1st.

The great background was from Scrapdiggity. So the process of creating the certificate was easy.


Making sure the readers don't forget:
With busy schedules it is easy to space out an extra activity. So I took two of Dr. Seuss's quotes and made it into a poem with additional information and lines that I wanted to add. I was able to be creative and fun with this reminder. I just hope the readers will not get offended.


What else? Well there is much more, but those will have to wait until that day. So that I can take great pictures to commemorate this great event. : ) Enjoy


UPDATE: I can not believe I never uploaded and shared the documents. On my pages I have added the invitation and reminder for Read Across America. On the top right side you will find them. 


Saturday, December 1, 2012

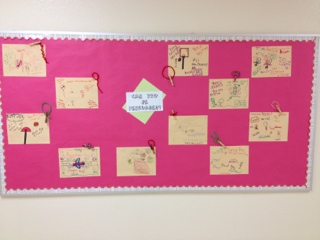
Can you be persuaded? Bulletin Board


This is a very simple bulletin board but with a lot of information and use. Not to mention how proud students were of their creations and work. This was a great way to end a unit on persuasive text and making connecting it to them, adding a personal meaning.

Students were to create something with materials I provided them with (materials that I had in the classroom and I had enough of for the entire class). In this occasion I provided the students with a pipe cleaner and a clothespin. The students were not allowed to add anything else to it but color the clothespin. They were allowed to put it together or use it as two different items.
After creating a product the students were to create an ad to persuade people to buy their product. The ad had to contain pictures, a name for the product, and persuasive vocabulary.


The students and I enjoyed this project. The students thought long and hard about what to create with the two items and came up with some neat products. I had bug catchers, hammers/hair extensions, lizards, basketball courts, item catchers, and many others. 

This bulletin board was not only a success in my classroom but inspired others to create something similar. One of my teammates gave students vegetable cards and had the students rename the vegetable to make them more appealing. In addition, the students created an ad for the vegetable to persuade others to eat them. 

Monday, October 8, 2012

Rounding

This rounding technique was not created by me. I was actually taught this technique by one of my team mates. 
This technique requires students to reference to a chart. Which will guide the students to getting the correct answer for rounding. It helps those students who struggle to visualize if to move up or down on a number line. In addition it helps the students who can not visualize the two numbers the rounding number is between. This technique has helped me have a better success rate with teaching rounding. I have also discovered that once students become proficient at rounding they soon can visualize the process and quickly round. Without doing the steps on paper. 
I have taken this technique to a different level by creating a poem describing the steps with catchy phrases or names to help students remember. That gave me a higher retention of the process with my students, but until this year I took it to the next level by creating a story and more relatable to them. My students loved the stories and many needed that to remember and understand. 

After creating my story I still had a few who could not "see" the steps so we created a motion picture of the steps. The simple steps were placed on a sentence strip that was folded into eights. Each box had the step on top and then a picture telling the story. 
After the story was drawn on the sentence strip, we took a black paper and cut two slits the size of the boxes. Students placed the strip through the slits and there they had their motion picture. My students were proud and loved their "movie." The title I gave my students was How to Round my students added The Movie. Some of my students even created an actual story with characters and plot to go along with it. 


You can get the story and steps here

Sunday, October 7, 2012

Story Elements


Last year in second grade I had the great opportunity to create a unit using the Common Core standards. I have taken it to the next level and made general activity sheets where character's names and story titles. I am excited to use these next quarter with my students. 
Flash Cards

Anchor Posters


Activity Sheets


This is an extensive story elements. This unit covered the 5 W's and H along with other important concepts that fall under each category. The unit covers minor/major character, flat/round character, comparing/contrasting characters, would you rather?, problem/solution, predicting, setting, character trait, and many more. By the end of the unit the students are familiar with the characters. 

Sunday, September 16, 2012

Referencing

As part of my Master's work I have learned how to reference my sources using the APA 6th edition style. It has been a learning experience and I am excited to share that learning with my students. 

We have started our Common Core Unit on bats and as part of our final assignment the students will write a report about a particular bat and reference the source for their information.  

I started by teaching how to reference a website that they would use. Students learned the basics of referencing a website and where to find the information that they needed. 
Once my students understood the basics of referencing a website (since that is what we were using at the time). I continued to build upon that with the basics of referencing a book. Just like the website reference students did not only have to learn how to create a reference but also how to find the components in the book. 
Once all of it was put together I am proud to show what my 3rd graders have learned. They did not only learn about bats, learning about the different information that is found in a website or book, but also APA formatting for referencing. I am a proud teacher. 

Tuesday, September 11, 2012

Yay so smart!

Two weeks ago I thought I was the greatest invention of all. Until I googled my idea to find out it already exists, but I just had time to blog about my experience. 

This is how it all started. For 6 years I have taught place value and value in a similar way with great success, until this year. I have my place value and value poem that explains the difference. I have my movements for my TPR and it always helped my students' brain to click into place and get it. Not this year. I don't know what is going on. As I was paraphrasing it to my students, I got a great idea. This is how it all started. Place Value is the location of the digit, and value is how much is inside the house.  Some AHHHH and some blank looks. Ok each digit is a house, the place value is the houses address, where the house is located at. Is it located on Street A and B Ave (I said actual streets that students can relate to) or on Street C and Ave D? My students said Street C and Ave D! I just had to laugh. 
Then my lesson continued to this board where I took my drawing a bit further to explain what I was saying. The thousand houses are located on Thousand Ave and the other half on One Street. The stop sign is the corner of the two streets where you have to stop. The value is how much money each house gets. One's gets only one dollar bills. How much does that house have?  Tens only gets ten dollar bills. Hundreds get hundred dollar bills. Thousands get a stack of 1,000 dollar bills tied together. Etc.  The majority of my students finally understood what they were doing, and a light bulb went on. 

To get a true assessment of their understanding and grasping the concept, for homework they had to explain the difference between value and place value. These are some of the examples I got. One of my students wrote a paragraph worth.
I thought about this next idea on my way home, to later find out it already exist out there. But mine is a tiny bit different from the rest. The ones I saw had one large house for that group of places. In my version each place is a house and the groups of digits are categorized by the street it is at, and the stop sign which I believe helps a lot of my students. 

How to use it? 
One of the most challenging things my students have had to do is take a large number that is in word form and convert it to numeric form. The comma is the stop sign so everything on the right of the word thousand goes on the right of the stop sign because the stop sign (comma) says thousand  (Thousand Ave) and everything on the left of the word thousand goes on the left of the stop sign. This way the student only focuses on the smaller number that goes on that street. They get thrown off by double hundred and the thousand words. Students get to write on the mat with dry erase markers! 
You can also have the write the numeric form and then use the same strategy and turn it into written form by doing one street at the time. (Remember the stop sign or comma already has the word thousand on it).

Challenge your kids more or practice more skills? I had students write the value of each digit at the bottom or the house under the digit. Once they finished they added their plus signs between the values and they had expanded notation. On top of the roofs they drew the model for each place and then they had their model. 


How to Make? Easy!
You only need (per student): 
1 Long construction paper (any color except red)
2 regular size color paper
1 Sentence strip
1 red construction paper or regular paper strip

How to put it together:
1. The long construction paper will be the background, it has to be horizontal. 
2. At the bottom of the paper leave a tiny space of construction paper and then glue the sentence strip onto the construction paper. (The writing portion of the street should be showing that will be the street and allow the students to write 2 lines of words)
3. Take the construction paper and fold it in half. 
4. On the sentence strip you will add the stop sign/comma. I had the students cut a square where they wrote stop and glued it onto the "side walk/on top of the writing area) Then take the sentence strip and fold it to make a J or comma looking figure and glue it under the stop sign and write the word thousand on it. 
4. Fold one of the color papers into 8ths. 
4. Cut out the rectangles. 
5. Using only one color place 3 rectangles on the right side of the stop sign. Make sure they fit with a tiny space between them before gluing if they do not fit cut off some of the sides. When you do glue them they must be on the sidewalk. They should not pass the sidewalk, that will be the writing area. 
6. Using one of the same color rectangles cut it into a square. Once it is a square fold it into half diagonally, then half again, to make 4 rectangles. 
7. Glue the triangles on top the rectangles and write the "address"/place value of the house.
8. Repeat steps 4-7 to do add the houses on the other side of the stop sign. 
9. *Optional* You can have the students write all the forms to express a number (I really did not use that part). 
10. Laminate, enjoy, use, and learn. 
Feel free to use my not so original idea. : ) I guess everything you think up someone else had also thought about it before. Hey that is life! How they say ALL great minds think alike, right? I hope you like this project and it is beneficial for you and your students. Let me know if it works out for you. : ) Smile In Life.