Thursday, December 28, 2017

Tech Tip Thursday

Last school year when I was asked to move to third grade, I was nervous as going from second grade to third grade meant teaching with Chromebooks instead of iPads.

Using QR codes to teach and have students complete activities was one of the great parts of iPads. For example, I would create a word problem for students to solve then check their work by scanning a QR code that would show the correct answer.

The problem with Chromebooks was the lack of the QR reader app. Well, that is what I thought until I found The QR Code Generator Scanner. By using the camera located on the Chromebook students can scan QR codes and see the website, text, or image.


Thursday, November 23, 2017

Tech Tip Thursday

Do you create worksheets, presentations, or anything else using a Google App such as Google Docs or Google Slides? If you have noticed there is a limited font choice to "beautify" your work.

Now you can add more to your document. Google has offered additional fonts that can be "downloaded" to your Google App database. The best part is that this can be done easily. 

You might not find the DJ Inker font or ABC Print Font, but there is something that might fit your need other than Times New Roman or Arial.

Thursday, November 16, 2017

Tech Tip Thursday


Do you have a great PDF, image, or slide that you want students to interact with? Do you use Nearpod? 

Nearpod is an interactive presentation and assessment tool that can be used in an amazing way in the classroom. Teachers can create presentations that contain interactive quizzes, polls, videos, images, drawing-boards, web content, and so much more. 

Creating a Nearpod lesson is simple. You can import a previous PowerPoint, an image, or a PDF into the lesson area. When importing the files, the program automatically creates each page into different slides. Then the lesson can be made into an interactive lesson. 

A slide can be made into a "Draw It" slide, which means that the image/PDF/slide that was uploaded is turned into the background image for a writeable canvas. Now the student can add text, draw, and annotate on the image. 

Thursday, November 9, 2017

Tech Tip Thursday

Have you ever worked hard in a file in Google Drive, and then out of no where it all disappeared?

That agonizing moment has happened to me multiple times. In that moment of disappointment I remember the savior of all Google Drive files.

Restoring An Old Version

This is great for those moments when you deleted everything then decided that you did want it, when collaborating with someone and did not like what they did. Basically for those time when you can't use the undo button. 

How do you do this: 

1. Click on File

2. Click on Version History

3. Click on See Version History

4. Click the version you would like to restore. 

5. Click on the blue Restore This Version button. 

*If you press command + Option + Shift + H you can skip step 1 to 3. 


Thursday, November 2, 2017

Tech Tip Thursday

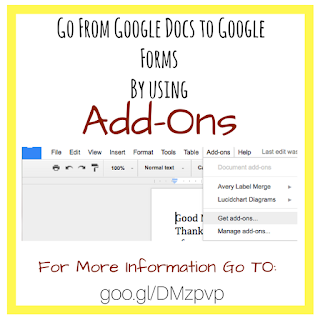
Do you have a great worksheet that you created on Google Docs or in a Word document? Do you want to convert this worksheet into a Google Forms so students can complete it online?

Simply thinking about having to create it again, seems daunting. There has to be an easier and more convenient way instead of recreating the wheel.

By using the fabulous Google Add-Ons available on Google Docs this process is easier.

To add this Add-On to your Google Docs simply click on Add-Ons menu and click on Get add-ons.

Search for "Doc to Form" in the add-on search bar.  Click on the Free button and download the add on to your Google account.

But how do you use this add on? This is simple.

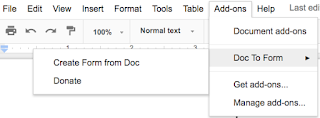
1. In your Google Doc that you want to convert, go to the add-ons menu.


2. Hoover over Doc to Form.


3. Click on Create Form from Doc

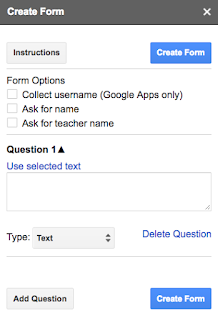
4. Click on the Form Options of your choice.

5. Select the text that will be part of your first question.

6.  Click on the blue "Use selected Text"

7. Select the correct type of question.

8. Click on Add Question or Create Form.

Thursday, October 26, 2017

Tech Tip Thursday

As a mom, teacher, and student I find it hard to find time to read the textbooks or articles assigned to me or my research.

The only way I have been able to keep sane is by having my Mac read me the text.

Disclaimer: Not every PDF is readable. Your PDF must be searchable, where you can select the text.

Before using this wonderful and easy to use tool you must set up the settings and preferences including the voice that will be reading out loud to you and the reading speed.

To set up the ability for your Mac to read to you:
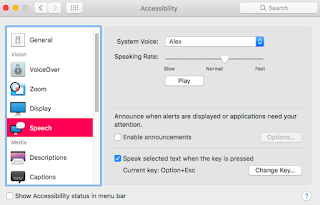
1. Click on System Preferences
2. Click on Accessibility
3. In the left menu click on Speech
4. Select the System Voice that is easier to understand.
5. Select the Speaking Rate that is easier for you to understand.
6. You can preview the voice and speed by clicking the "Play" button.
7. Select the check book that states "Speak selected text when the key is pressed"

Once this tool is set up you can start using this tool. Simply select the text that will be read then press option & esc at the same time and listen to the text.

Thursday, October 19, 2017

Tech Tip Thursday

Keep your browser running to it's fullest potential by decreasing the working memory and tab clutter.
With the click of a button, all opened tabs are placed in a list organized by the day they were placed on the One Tab list. 

You can reopen a saved tab simply by clicking on the link from the list. 

To delete a link from the list is a simple task. Simply click on the X next to the link. 

To find out more about One Tab or to download the chrome extension go to:
one-tab.com


Thursday, October 12, 2017

Tech Tip Thursday

Do you have a long link or a link with many characters after the .com? Do you have to write a link on the board or share a non-hyperlinked site?

That problem can be easily solved by using goo.gl

Now you can share a short link that is easier to copy. The only downfall about using goo.gl is that the sharing link is case sensitive. Any capital letters need to be typed in as a capital letter or else it will not work. 

To create a shortened link: 

1. Go to goo.gl

2. Type the original URL in the space provided. 

3. Click on the box that confirms that you are not a robot. 

4. Click on shorten URL. 


5. Copy the shorten URL. (It is case sensitive)


Thursday, October 5, 2017

Tech Tip Thursday

As a teacher, we usually send our weekly updates, mass emails, or event notifications to all the classroom parents.

Usually, when sending these mass emails all of the parents' emails are part of the email giving access to confidential information to others. As the emails are listed in the "TO" line.

The problem with doing this is that all parents have access to each other's emails, parents can send an email by hitting "reply all" and emailing all parents creating a massive email. Not only that but some parents have issues with privacy and do not want their email given to anyone.

Scenario why not to use "TO" when sending an email to a group of parents: 

Let's say Billy's Mom had a problem with Jose's Mom because Billy and Jose cannot get along during recess and Billy has been getting in trouble. Billy's mom can look at the email you sent and get the email for Jose's mom. Billy's mom keeps on sending non-stop emails to Jose's mom and she is blaming you for the harassment she has been receiving in the email.

How can you avoid this:
By listing all the parents' email under the "BCC" line. By doing this, all the recipients will receive the email, but they can not see who else got the email nor "reply all" they can only reply to the sender.


To use "BCC" when emailing click on the "BCC" line and start typing the group of email addresses that you would like to send to.


When the recipient receives the email they see an empty "To" line.